When a door handle is not installed correctly, it can encounter issues like sticking or failing to latch properly. For smooth operation and door security, proper door handle installation is necessary. With the correct equipment and skills, installing a door handle ought to be a simple task. You might be surprised at how simple it is to replace noisy or broken handles. Most handles come with a template and a fitting kit: simply drill the holes, install the parts, and follow the measurements. You can quickly fit your new handle with the help of our tutorial.
Different Types of Door Handles + Features
Before we begin discussing how to install a door handle, we have prepared a table showing different types of door handles and their features, so you can choose the best option depending on your door type. Let’s take a look:
| Type of Door Handle | Description | Common Features |
| Lever Handles on Backplate | Traditional style with a rectangular or round backplate fixed to the door. | Often includes a keyhole or privacy lock; ideal for classic interiors. |
| Lever Handles on Rose | Sleek, modern handles mounted on a small circular plate (rose). | Minimalist look; usually without a keyhole; additional lock can be installed if needed. |
| Knob Handles | Timeless, rounded or oval handles that turn to open the door. | Elegant design; commonly used for internal doors; requires more effort to turn. |
| Pull Handles | Designed mainly for pulling doors open or closed, without a latching mechanism. | Often used on industrial, commercial, or sliding doors; functional and sturdy. |
| Privacy/Bathroom Handles | Includes a built-in thumb turn lock for added privacy. | Best for bathrooms or bedrooms; provides locking without a separate key. |
Important tips for door handle installation
To effectively finish a door handle installation and improve the look and functioning of your door, pay attention to these important tips:
- Measure Twice, Drill Once: Precise measurements are crucial. Before drilling or chiselling, make sure all markings are secure and aligned correctly.
- Comply with the manufacturer’s guidelines: Always consult the installation instructions that came with your handle, as each model may have different processes.
- Drill Depth Marking with Masking Tape: To mark the proper depth, wrap masking tape around your drill bit. By doing this, over-drilling is prevented and accuracy is guaranteed.
- Handle Orientation Matters: A minor item that has a significant impact on usability is handle orientation. Make sure the handle is orientated to turn downward once installed.
- Secure Fittings and Components: To save annoyance later and guarantee long-term durability, take care of frequent problems like misalignment or loose fittings as soon as possible.
- Take Your Time: Rushing can result in errors. Both performance and finish will be enhanced with patience and careful handling during installation.
- Consider Professional Assistance for Expert Results: Professional installers can guarantee a faultless outcome if you’re unsure or want extra security and accuracy.
Tools Needed to Fit a Door Handle
It’s time to learn how to install a door handle. Gather the following tools before you begin:
- Tape Measure: For accurate placement and spacing.
- Pencil: To mark drill points and guide lines.
- Screwdrivers: To match various screw types.
- Drill with Timber Bits: Includes a 2mm bit for pilot holes and a 25mm spade bit for the latch or lock.
- Masking Tape: To mark drill depth and protect surfaces.
- Chisel: For shaping the mortice.
- Rubber Mallet: To gently tap the chisel or parts into place without damaging the door.
- Door Wedge: Keeps the door stable during installation.
- Safety Goggles and Mask: To protect your eyes and lungs from dust and debris.
- Door Handle Kit: To make sure it includes the handle, screws, latch, and any fittings required.
How to Fit a Door Handle: Step-by-Step Guide
To fit door knobs easier and faster, every door handle comes with fitting instructions and measuring templates. But if you don’t have these for any reason, don’t worry, here we tell you how to install a door handle in simple steps:
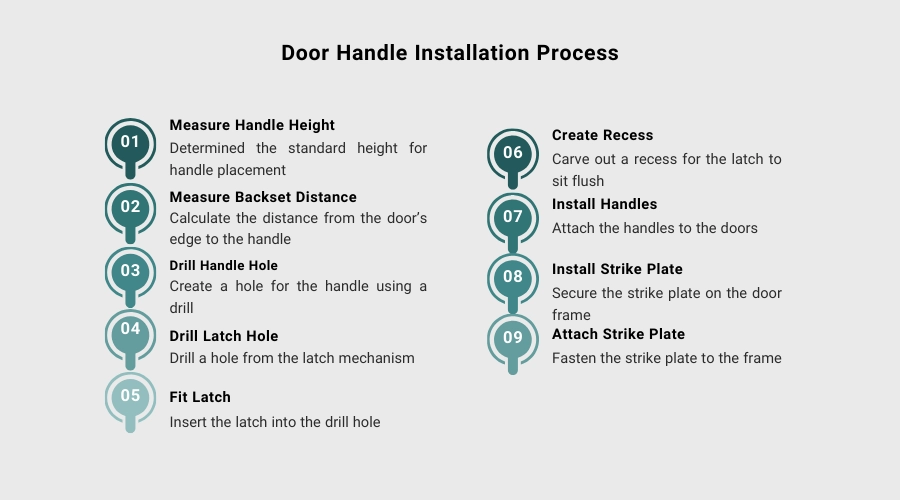
1- Measure the Height of the Handle:
If your door is new, you will then need to cut a hole for the handle. First, note the typical height of a door handle, which is typically 1050 mm from the floor to the handle’s centre. Draw this line precisely all the way around the door using a square tool. Make sure the new handle is the same height as the others in your home if you’re merely replacing an old one. On the door’s side, note its height.
2- Measure the Backset Distance:
The “backset” is the distance between the centre of the handle hole and the door’s edge. Most of the door handle kits include a conventional backset, often measuring 60 or 70 mm. You will drill the hole for the handle at this distance from the door’s edge, so measure and mark it.
3- Drill the Hole for the Handle:
At that moment, attach your hole saw bit to your drill and carefully drill through the indicated front of the door. Drill halfway through from one side to prevent the wood from splintering, and then finish the hole by drilling from the opposite side to create a neater hole.
4- Drill the Hole for the Latch:
Drill a hole for the latch into the door’s edge using a 24- to 25-mm spade bit. Make sure there is adequate depth in the hole for the latch to fit securely.
5- Fit the Latch:
Drill a hole for the latch into the door’s edge using a 24- to 25-mm spade bit. Make sure there is adequate depth in the hole for the latch to fit securely.
6- Create the Recess:
At that moment, draw around the latch’s edge with a Stanley knife, then remove it. Using your chisel, slowly chip away a small portion of wood until the latch is level with the door’s edge. After completing that, screw it down and replace the latch.
7- Install the Handles:
Now, it’s time for door handle installation. Align the spindle, which is the metal rod that passes through the latch, with the outside handle. Attention, everything should be lined up properly by inserting it into the hole you drilled and then placing the inside handle on the opposite side. To understand if everything functions properly, tighten the screws holding both handles in place and give it a go.
8- Install the Strike Plate:
Close the door and mark the area on the frame where the latch comes into contact with it. Take a measurement from the latch’s edge to the door’s edge, then transfer that measurement to the door frame.
9- Attach the Strike Plate:
Last but not least! After making your mark, place the striking plate on it and use your Stanley knife to sketch around it. Remove the plate and slightly chip it out so that it is level with the frame. After using a spade bit to drill a small hole for the latch bolt, screw the strike plate into position.
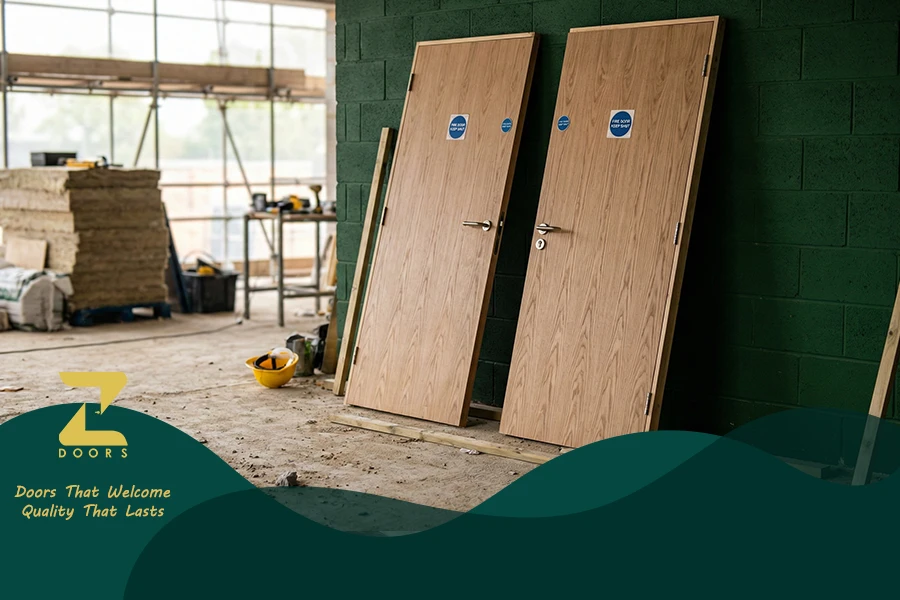
That’s it! Now, you’ve learned how to install a door handle successfully. But don’t forget to check for additional safety features where needed, like What is a self-closing fire door.
How to Replace an Existing Door Handle
You can replace an existing door handle much more easily than fitting a new one. This is because when replacing an existing one, the spindle and latch holes are already in place, and you don’t need to alter them. However, sometimes your new handle’s fixings don’t align with the existing holes. In this case, replacing it may not be as easy, as you’ll need to measure carefully, mark new positions, and ensure both the latch and spindle line up properly before fitting the new hardware.
At that point, unscrew the front and back plates to remove the old handle. A standard screwdriver will usually suffice. If you can’t see any screws, look for a hidden fixing—many handles have a cover. Look for a small slot into which you can insert a flathead screwdriver to remove the cover and access the screws beneath. Once removed, you can align and fit your new handle, making sure it sits snugly and functions as intended.
Door Handle Standards
Before putting your order, it’s wise to confirm that your doors adhere to the European or Scandinavian standards. It can help you decide which to pick and understand the distinctions. Start by examining your current mounting plates first:
Scandinavian Standard:
- Four equal-sized screw holes in a narrow vertical cross pattern.
- Diagonal C/C (centre-to-centre) measurement: 30mm.
- Common in doors using model 2014- lock cases.
- Look for the model number on the edge of your lock case.
European Standard:
- Screw holes are parallel to the square spindle hole.
- C/C measurement: 38mm.
- Often includes four smaller holes for wooden doors.
In essence, you can understand whether a Scandinavian or European standard handle is required by location of the screw holes. To ensure a proper fit, check those holes before buying a door handle. Check yours to be sure. Generally, Scandinavian countries use the Scandinavian type, whereas other European countries use the European kind. If you’re working with safety-critical doors, you should consider Fire door Regulations to ensure compliance when selecting and installing handles.
Door Handle Installation Issues and Fixes
During the door handle installation, you may encounter some issues. In the following table, we gathered the common problems along with solutions that can be helpful:
| Problem | Solution |
| Misaligned strike plate & latch | Measure alignment, adjust or replace the strike plate as needed. |
| Improperly drilled screw holes | Use a door wedge, mark holes carefully, and fill oversized holes if necessary. |
| Warped door jamb or frame | Inspect and shim or replace damaged areas. |
| Latch mechanism misalignment | Ensure knobs connect properly; reassemble and test. |
| Compatibility issues with old doors | Measure existing holes; modify door if needed. |
| Loose handles or knobs | Tighten or replace screws; use thread-locking adhesive. |
| Latch plate not flush | Deepen recess with chisel; reinstall and test. |
| Incompatible door lock | Match hardware and keys; test before final installation. |
| Misplaced screws | Organise parts before starting; use a container to hold small items. |
Discover the best door handles in Zdoors
At Zdoors we are thrilled to provide an amazing selection of ironmongery, including an amazing collection of door handle kits, in addition to a terrific selection of internal doors. Be sure to visit our door frames, fire doors, mouldings, and hardware collection. Our interior door handle packs are available in a wide variety of styles and materials, and they come with all the necessary templates and fasteners to ensure a hassle-free installation.
Conclusion
Now, you’ve learned how to install a door handle. To fit door Knobs is not only about getting your door handle fitted correctly; it’s also about keeping your home safe, making it seem good, and ensuring that your door hardware lasts longer. If it’s bodged, you may experience misaligned parts, loose parts, or even security issues if the latch or lock doesn’t catch properly.
You can avoid all of that, save money by calling someone in, and ensure that your doors look amazing and function flawlessly by knowing how to install a door handle correctly. We’ve covered everything in this blog post, including the necessary tools, step-by-step instructions, helpful advice, and typical pitfalls you may encounter. So now, door handle installation is as easy as pie for you.
FAQ
1) Can I change a door handle myself?
Yes, with basic tools and a basic knowledge which you can gain from this blog, you can easily replace a door handle yourself.
2) Is it easy to fit or change an interior door handle?
Yes, it’s not hard, especially if you’re replacing an existing one with the same size.
3) What is the standard height for a door handle?
The standard height is typically 1050mm from the floor to the centre of the handle.
4) Do all door handles fit all doors?
Door handles aren’t a one-size-fits-all job. This isn’t a bother for new doors, but swapping handles on existing doors can be a bit of a faff. You’ll need to think about:
• How long the latch is.
• The size and where the existing hole is.
• Where the old screw holes were (you might need to fill and paint them if the new backplate’s smaller).
• Where any locks are (most inside doors have the keyhole centre about 57mm below the handle’s turning bit, but this can vary a bit).