To securely position a door, it’s important to fit the door frame properly. The door frame, which is usually built into the wall construction, offers crucial support that makes it possible for the door to open and close smoothly. It’s critical to acknowledge that doors and the frames that go with them differ. For both external and internal doors, precise frame installation is essential to guarantee a good fit and intended function. A properly placed frame ensures the door’s smooth operation and long-term durability. The goal of this blog post on ZDoors is to provide essential knowledge for how to fit a door frame. We give you all the information you need and provide a step-by-step guide. So, let’s get started.
Door frame and its main sections
The structure that envelops and supports the door is called the door frame. It ensures the door functions correctly and remains stable. It is made up of some essential parts, each of which plays a different role. Here are the door frame’s main sections:
- Door Head (Header): The bit across the top of the frame. It’s important for keeping the frame straight and strong.
- Hinge Jamb: The upright side of the frame where the door hinges are screwed in.
- Strike Jamb: The side where the door locks into. These hold the door and let it swing open and shut nicely.
- Door Sill: The bottom part of the frame that joins the two jambs. It often has a threshold to stop draughts and dampness, especially on external doors.
- Stop: A thin bit of wood fixed inside the jambs and head. It stops the door from swinging too far and makes sure it closes properly.
- Casing (or Architrave): The fancy trim around the doorway on both sides. It hides any gaps between the frame and the wall, making it look smart.
- Weatherstripping: Strips along the edges of the frame (usually on the jambs and head).
- Door Sweep: A strip fixed to the bottom of the door. It seals the gap between the door and the sill, to stop draughts and bits of muck.

To install a door handle, mark the 1050mm height. Mark at a distance of 60 or 70 mm from the edge. A handle hole should…
How to Measure for a Door Frame Before Installation + Standards
Before you learn how to fit a door frame, you need to learn how to measure up for an internal door frame. Whether you’re replacing an old door or fitting a new one, you need to measure for your door frame based on standards to ensure the door will fit nicely, swing smoothly, and won’t have any unsightly gaps or misalignments.
Get a tape measure; for accuracy, millimetres work best. If you feel that the walls are a little off, you could find a spirit level useful.
- Width: Take measurements at the top, centre, and bottom of the doorway’s interior. Use the smallest of the three and write them down.
- Height: Take measurements of the left, middle, and right openings from top to bottom. Make a note of all three, then select the tallest one.
- Depth: Determine the thickness of the wall where the frame will be installed. This indicates how deep the frame must be in order to sit flush with the architrave and the wall.
- Look for Wonky Bits: Pay close attention to whether the floor slopes, the walls are uneven, or the opening is twisted. If so, you may need to hire a professional carpenter or modify your measurements.
- Don’t Forget the Door Bits: If you’re getting a special, made-to-measure door, you need to leave space for hinges, handles, the latch, and where the door will swing, especially for internal doors.
Tools You Need to Fit a Door Frame
Before we start to tell you how to fit an internal door frame, you need to prepare these tools:
- Spirit level: to make sure the frame is straight and upright.
- Tape measure: for accurate measurements.
- Screwdriver or drill: for putting in screws.
- Screws and wall plugs: to fix the frame in place.
- Wedges: to keep the frame steady while you work.
- Foam filler: to fill any gaps between the frame and the wall.
- Pencil: for marking where to drill or screw
How to fit a door frame
The installation of a fixed-width door frame (it can be an aluminum door frame, for example) is a process that requires precision, but by doing it step by step, following the instructions below, you can achieve a solid and aesthetically pleasing result.
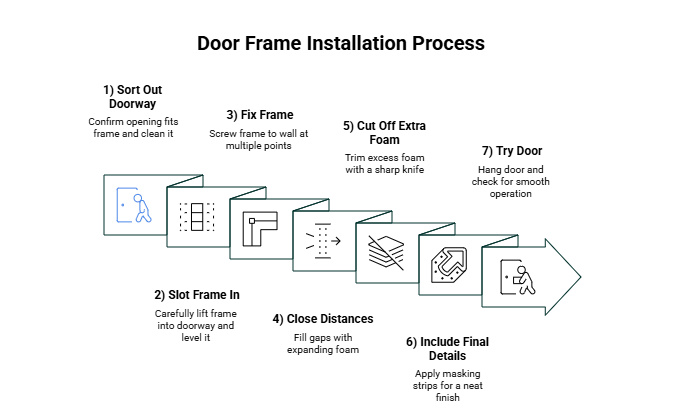
✅ Step 1: Sorting Out the Doorway
To begin with, confirm that the door openingy fits your frame properly. Clean it well and remove any dirt or dust. Make an effort to level out any uneven sides.
✅ Step 2: Slotting the Frame In
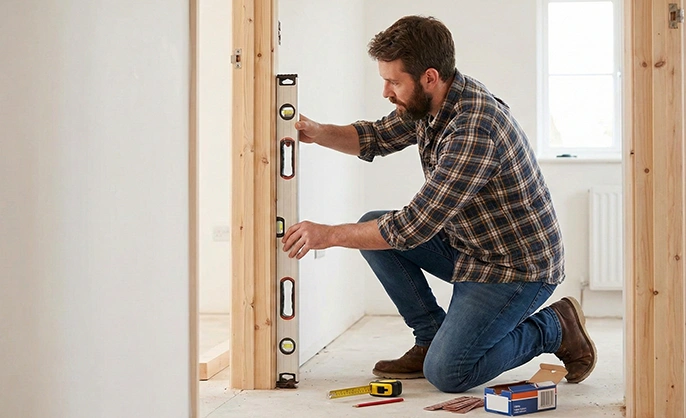
Carefully lift the frame into the doorway. Use little wedges to hold it in place. Get your spirit level out again to check it’s straight up and down and across.
✅ Step 3: Fixing the Frame
Screw the frame to the wall once it sits perfectly. Attach screws to the middle, bottom, and top of each side. Avoid overtightening them as this may cause the frame to become distorted.
✅ Step 4: Closing the Distances
Fill up any spaces between the wall and the frame with expanding foam. Take your time; if you do too much, the frame may become out of alignment. Follow the directions to allow it to properly dry.
✅ Step 5: Cutting Off Extra Foam
Using a sharp knife, carefully cut off any excess foam once it has solidified. Be careful not to scratch the wall or the frame.
✅ Step 6: Including the Final Details
To conceal any gaps and create a neat appearance, wrap your masking or cover strips around the frame. They can be adhered with a little adhesive or tiny nails.
✅ Step 7: Trying the Door
Hang the door after fastening the hinges to the frame. To check that it swings smoothly and doesn’t get trapped anywhere, open and close it a few times.
How to fit an external door frame
Now that you learned how to fit an internal door frame, you may need to learn how to fit an external door frame too. Here are what you need and the essential steps:
✔️ What You’ll Need:
- Door frame kit
- Drill & screwdriver
- Spirit level
- Tape measure
- Hammer
- Saw
- Pencil
- Suitable fixings
- Waterproof adhesive sealant
- Waterproof caulk
- Packers and shims
Steps for fitting an external door frame
Here are the steps on how to fit an external door frame:
1. Check the Opening: Take diagonal measures across corners; they should be within 5 mm. Since there is limited margin for mistakes with external doors, make any necessary adjustments.
2. Assemble the Frame: Use screws and waterproof glue to attach the head, sill, and jambs on a dry surface. If necessary, attach the weather bar. Make sure everything is straight and level.
3. Prepare the Opening: Use shims to level the bottom. Put two or three beads of waterproof caulk at the bottom for the sill and around the top and sides.
4. Fit the Frame: Lift and tilt the frame into position, beginning with the sill, to fit it. Push it into the opening gently.
5. Verify Alignment: Balance the shim and sill as necessary. Line up the entire frame. Make sure there is a 2mm space on the top and both sides of the door when it is fitted.
6. Fix the Frame: Use fixings (two to three at the top, four to five on each side) and drill pilot holes. Make sure the frame is square. Screws should be spaced one-third of the way from the edge of brick or block walls.
7. Seal Any Gaps: If gaps remain, fill with expanding foam and seal edges with waterproof caulk.
How to fit a door frame in a brick wall
Fitting a door frame in a brick wall includes different steps. Here are the steps you need to follow for fitting a door frame in a brick wall:
Step 1: Measure the Rough Opening
Your rough opening must be larger than the frame of a brick wall. Increase your door frame’s width by 4½ inches and its height by 2¼ inches. Your door’s rough opening should be 40½” wide and 86¼” high, for instance, if it is 3′-0″ x 7′-0″. You can avoid doing any masonry work if you’re replacing a door that is the same size.
Step 2: Create the rough opening (for new doors)
Using chalk, draw the general shape of the opening on the brick wall. Use a mortar saw (or grinder if necessary) to cut along the outline. For protection, put on safety goggles and a dust mask. Then, to loosen the bricks, drill into the grout lines inside the designated region. Carefully remove the bricks with a hammer and chisel, leaving them in place in case you need them later.
Step 3: Remove the Old Frame (For Replacements)
Make sure the frame has screws before replacing an old door. If they are there, unscrew them. If not, mortar and wire or tee anchors are probably holding the frame in place. To loosen the mortar, use a hammer and chisel, being careful not to shatter any nearby bricks. To clean the opening, remove any last bits of mortar or debris.
Step 4: Position and Level the New Frame
Use a door frame made of metal that has dimples and punch anchors. Insert wood spreaders at the base and centre of the frame to secure it in place after placing it into the opening. Verify that everything is plumb and straight using a level and a square.
Step 5: Fix the Frame to the Brick Wall
Find the holes in the frame that have already been punched. Through these spots, drill 3/8″ holes that are at least 4″ deep into the masonry. To attach the frame, insert 3/8″ x 4″ masonry sleeve anchors and slowly tighten them.
Step 6: Hang the Door
Use hinges to attach the door to the frame. When the door is closed, use shims to ensure that the space between it and the frame is uniform on both sides. To ensure a smooth swing, adjust as necessary.
What Type of Door Frame Should You Use for Different Doors?
Door frames add to the overall appearance and are necessary for safely mounting and operating doors. It’s important to choose the correct type of door frame for any door; for example, fire doors need a different type of door frames. Each frame is suitable for a specific scenario or door design. To help you make your choice, you can see popular door frame options in the following table:
| Type of Door Frame | Description | Common Use |
| Standard Single Frame | Consists of two vertical jambs and one horizontal header. | Used for most single doors. |
| Double Door Frame | Built to accommodate French doors. | Ideal for main entrances or large rooms. |
| Pocket Door Frame | Allows a sliding door to retract into the wall, hiding it completely when open. | Great for saving space and a sleek look. |
| Bi-fold Frame | Supports doors that fold in the middle on a track system. | Common in closets and pantries. |
| Pivot Frame | Lets the door rotate on a pivot point from the side or center rather than traditional hinges. | Adds a modern, elegant touch to entryways. |
Key tips when replacing a door frame
In addition to learning how to fit a door frame, you need to consider some key tips to ensure your door frames are installed correctly. Also, to do the fitting process safely, it’s important to consider these tips:
- Good Wood: Choose straight, clean wood that is free of rot, bends, cracks, and markings. Good timber is necessary for strong structures.
- At first, bigger is better: Choose a frame that is a little bit higher or wider if you are unsure of the size. It can never be made larger, but it can always be made smaller.
- Protect Your Eyes: When cutting wood, wear safety glasses to protect your eyes.
- Protect Your Hands: If you’re working with a hammer and nails, gloves can be helpful.
- Utilise Tools Properly: Use caution when handling heavy or pointy objects. To prevent errors and injuries, take your time.
- Keep Kids away of the Work Area: This do-it-yourself project involves heavy objects and sharp equipment, so keep kids away from the area.
- First-Aid Close by: Mishaps can occur. Keep a first aid kit handy for emergencies.
📝 Note: Before fitting a door frame for a fire door, read the fire door frame regulations.
Common Mistakes to Avoid When Fitting a Door Frame
Even if you are an experienced person and know how to fit an internal door frame, it can go wrong for you. That’s because of making some common mistakes. One of them is inaccurate measurements that can result in a poorly fitting and unsightly frame. Another mistake includes using the incorrect screws or bolts. To maintain the stability and strength of door frames, always use fixes designed for them.
Another major issue is forgetting to weatherproof. The frame will not function as effectively or survive as long if you don’t seal the area surrounding it. Water can enter and cause damage, and drafts will occur. If you consider these mistakes and try to avoid them, your door frame will be long-lasting, secure, and functional.
How long does it take to replace a door frame?
If you’re an experienced DIYer and know how to fit an internal door frame, it may take 2 or 3 hours. But if you’re a novice, you should set aside as much as a full day for fitting a door frame. Not to mention that if you’re going to replace an external door frame, and know how to fit an external door frame, it can take longer, at least four to five hours.
How much does it cost to replace a door frame in the UK?
The cost of a door frame in the UK depends on many factors, including the type of door frame, the material, and the complexity of the installation.
Discover the best door frames in ZDoors
At ZDoors, you can find your desired door frame from a wide selection of choices. To ensure you get the best value for your investment, high-quality materials are combined with unbeatable prices. You can find any door frame type, from classic wooden to sturdy metal ones. The only thing you need to do is check our door frame page, and we’ll help you choose the ideal option for your home or business.
Conclusion
In this blog post, we mentioned how to fit an external door frame and how to fit an internal door frame. We tried to cover everything from the various types available to common mistakes made during installation. We also emphasised the importance of taking accurate measurements, using the right tools, and keeping safety in mind for a hassle-free job. Our experienced staff is available to help you choose and install the perfect door frame to truly transform your space.
FAQs
1) What tools do I need to fit a door frame?
You’ll need a tape measure, level, drill, hammer, nails or screws, saw, and safety gear (gloves, goggles).
2) Can I fit a door frame myself, or should I hire a professional?
If you learn how to fit a door frame, you can do it yourself. Also, you need some DIY experience. But if you’re unsure, we recommend hiring a professional for a better result.
3) How are door frames attached to the wall?
Door frames are typically attached using screws or nails, with anchors or bolts to secure them to the wall.
4) Why won’t my door fit in the frame?
Your door may not fit due to inaccurate measurements, a warped frame, or improper installation, such as a frame that’s not level or square.